Androidプログラミング日記 (仮)

| 使用画像 前回のままです。 |
  |
|
ファイル名「Robo1Activity.java」 ここはそのまま
package and.roid.robo1;
import android.app.Activity;
import android.graphics.PixelFormat;
import android.os.Bundle;
import android.view.Display;
import android.view.Window;
import android.view.WindowManager;

public class Robo1Activity extends Activity {
	public float disp_w,disp_h;
    @Override
    public void onCreate(Bundle savedInstanceState) {
        super.onCreate(savedInstanceState);
        requestWindowFeature(Window.FEATURE_NO_TITLE);
        getWindow().setFormat(PixelFormat.TRANSLUCENT);
        Window window = getWindow();
        getWindow().addFlags(WindowManager.LayoutParams.FLAG_FULLSCREEN);
        WindowManager manager = window.getWindowManager();
        Display disp = manager.getDefaultDisplay();
        disp_w = disp.getWidth();
        disp_h = disp.getHeight();

        setContentView(new MainLoop(this));
        //setContentView(R.layout.main);

    }
}
|
Activityファイルは、一番下の段のコードがたまに変わるだけでいつもこのまま使っています。 完全フルスクリーン仕様&画面の幅、高さを取得しています。 |
ファイル名「MainLoop.java」 ちょこっと変更
package and.roid.robo1;

import android.content.Context;
import android.content.res.Resources;
import android.graphics.Bitmap;
import android.graphics.BitmapFactory;
import android.graphics.Canvas;
import android.graphics.Color;
import android.graphics.Paint;
import android.graphics.Paint.Style;
import android.graphics.Rect;
import android.graphics.drawable.BitmapDrawable;
import android.graphics.drawable.Drawable;
import android.util.AttributeSet;
import android.view.MotionEvent;
import android.view.SurfaceHolder;
import android.view.SurfaceView;
import android.view.View;

public class MainLoop extends SurfaceView implements SurfaceHolder.Callback,Runnable{
	public static final int GAME_START = 0;//ゲーム状態固定値
	public static final int GAME_PLAY = 1;//ゲーム状態固定値
	private int game_state;//ゲーム状態決定変数
	private Thread thread;
	private SurfaceHolder holder;
	private float disp_w,disp_h;//画面の幅高さ
	private Robo1Activity robo1;//Activityクラス登録
	private int sleep;//遅延時間

	//変数設定

	private Drawable buckimg;
	private Object buck;
	private Object robo;
	private Drawable[] roboimgs;

	private boolean robomovekeystate;//タップ長押し処理用
	private int key_x,key_y;

	//変数設定ここまで

	public MainLoop(Context context) {
		super(context);
		init(context);
	}
	public MainLoop(Context context, AttributeSet attrs) {
		super(context, attrs);
		init(context);
	}

	public void init(Context context){
		holder = getHolder();
		holder.addCallback(this);
		holder.setFixedSize(getWidth(), getHeight());
		robo1 = (Robo1Activity)context;
		disp_w = robo1.disp_w;//画面幅取得
		disp_h = robo1.disp_h;//画面高さ取得
		game_state = 1;//ゲーム状態

		//ここから初期化

		this.setSleep(50);//ループ中遅延時間
		robomovekeystate = false;

		Resources resources = context.getResources();//画像登録準備
		buckimg = resources.getDrawable(R.drawable.buck);//背景画像取り込み
		buck = new Object(disp_w,disp_h);//背景画像をオブジェクト登録
		buck.Drawableinit(buckimg,disp_w/2,disp_h/2,854,480);//背景画像初期設定

		roboimgs = new Drawable[5];
		Bitmap img= BitmapFactory.decodeResource(resources,R.drawable.android_ugoki);
		for(int i=0;i<roboimgs.length;i++){
		roboimgs[i] = new BitmapDrawable(
				Bitmap.createBitmap(img,i*(img.getWidth()/5),0,img.getWidth()/5,img.getHeight()));
		}
		robo = new Object(disp_w,disp_h);//ロボ画像をオブジェクト登録
		robo.Drawablesinit(roboimgs,425,300,85,100);//ロボを初期設定


		key_x = 0;
		key_y = 0;

		//初期化ここまで

	}

	public void run() {
		Canvas c;
		Paint p = new Paint();
		p.setAntiAlias(true);

		while(thread != null){
			c = holder.lockCanvas();

			//ゲーム状態によってスイッチ処理
			switch(game_state){
			case GAME_START:
				StartDraw(c);
				break;
			case GAME_PLAY:
				PlayDraw(c,p);
				break;
			}
			holder.unlockCanvasAndPost(c);

			try {
				Thread.sleep(sleep);
			} catch (Exception e){}
		}
	}
	//タッチ処理
	public boolean onTouchEvent(MotionEvent event){
		int action = event.getAction();
		key_x = (int)event.getX();
		key_y = (int)event.getY();
		float time = event.getDownTime();
		switch(action){
		case MotionEvent.ACTION_DOWN:
			switch(game_state){
			case GAME_START:
				break;
			case GAME_PLAY:
				if(robomovekeystate==false){robomovekeystate=true;robo.setJetState(true,3);}
				break;
			}
			break;
		case MotionEvent.ACTION_UP:
			switch(game_state){
			case GAME_START:
				break;
			case GAME_PLAY:
				if(robomovekeystate==true) {robomovekeystate=false;robo.setJetState(false,0);}
				break;
			}
			break;
		case MotionEvent.ACTION_MOVE:
			switch(game_state){
			case GAME_START:
				break;
			case GAME_PLAY:
				break;
			}
			break;
		}
		return true;
	}

	public boolean RectTap(int x,int y,Drawable[] gazou,int keystate){
		return gazou[keystate].getBounds().left < x && gazou[keystate].getBounds().top < y &&
		gazou[keystate].getBounds().right > x && gazou[keystate].getBounds().bottom > y;
	}

	public void StartDraw(Canvas c){
	}
	public void PlayDraw(Canvas c,Paint p){
		//プレイ画面表示
		buck.Drawabledraw(c, p);
		c.save();
		robo.Drawablesdraw(c, p);
		c.restore();
		float ac=0;
		if(robomovekeystate==true) {ac=0.25f;}else{ac=-0.25f;}
		robo.DrawableJump(ac,key_x,key_y);

		drawString("kye:"+robomovekeystate,50,100,20,Color.WHITE,c,p);
	}

	public void drawString(String str,int x,int y,int size,int col,Canvas c,Paint p){
		p.setColor(col);
		p.setTextSize(size);
		c.drawText(str, x, y, p);
	}

	public void setSleep(int s){sleep=s;}
	public void surfaceChanged(SurfaceHolder arg0, int arg1, int arg2, int arg3) {}

	public void surfaceCreated(SurfaceHolder arg0) {thread = new Thread(this);thread.start();}

	public void surfaceDestroyed(SurfaceHolder arg0) {thread = null;}
}
|
メンバ変数にkey_x、key_yを追加。これはタップ位置を格納する変数です。 あとはタップしている時にObjectクラスのメソッドに渡していたacの値を、タップ中なら0.25、そうでなければ-0.25とし、押していれば加速し、押していなければどんどん減速して後退してしまうようにしました。 robo.drawの前と後ろにc.save()、c.restore()メソッドを追加しています。これはObjectクラスの方で、ロボ画像を角度に合わせ回転させているのですが、この二つのメソッドがないと他のオブジェクトまで回転してしまうため回転させたいオブジェクトをこの二つのメソッドで囲んでいます。 Objectクラスメソッドも変更していてDrawableJump()メソッドにタップ位置座標を渡しています。 |
ファイル名「Object.java」結構追加
package and.roid.robo1;

import android.graphics.Canvas;
import android.graphics.Color;
import android.graphics.Paint;
import android.graphics.Paint.Style;
import android.graphics.Rect;
import android.graphics.drawable.Drawable;

public class Object {
	private static final float GRAV = 0.15f;//0.45f
	public float px,py;	//Rect,画像の中心座標
	private int w,h;		//Rect,画像の横幅縦幅
	private float wh,hh;	//Rect,画像の大きさ/2
	private Rect rect;		//Rect,画像ののRect

	private float[] linexy;	//Lineスタート座標エンド座標
	private int lw;			//Lineの太さ
	private Style style;	//Lineのスタイル

	private int col;		//オブジェクトカラー
	private int alpha;		//オブジェクト透過度

	private Drawable obj;	//Drawable型の画像
	private float speedx,speedy;//オブジェクトスピード

	private double disp_w,disp_h;

	private Drawable[] objs;
	private int objs_state;
	private boolean jet_state;

	private float grade;


	//コンストラクタ
	public Object(double ww,double hh){
		disp_w = ww;disp_h=hh;
	}
	//円を作成したいときの初期設定
	public void Circleinit(float px,float py,int w, int col,int alpha,Style style){
		this.px = px;
		this.py = py;
		this.w = w;
		this.col = col;
		this.alpha = alpha;
		this.style = style;
		h=0;
		setgetDrawableSize();
	}
	//四角形を作成したいときの初期設定
	public void Rectinit(float px,float py,int w, int h,int col,int alpha){
		this.px = px;
		this.py = py;
		this.w = w;
		this.h = h;
		rect = setgetRectSize(new Rect((int)(px-w/2),(int)(py-h/2),(int)(px+w/2),(int)(py+h/2)));
		this.px = rect.left;
		this.py = rect.top;
		this.w = rect.right;
		this.h = rect.bottom;
		this.col = col;
		this.alpha = alpha;
	}
	//ラインを作成したいときの初期設定
	public void Lineinit(float[] lxy,int col,int w,Style style){
		linexy = new float[4];
		linexy = setgetLineSize(lxy);
		this.col = col;
		this.lw = w;
		this.style = style;
	}
	//Drawable型の画像を作成したいときの初期設定
	public void Drawableinit(Drawable img,float px,float py,int w, int h){
		this.obj = img;
		this.px = px;
		this.py = py;
		this.w = w;
		this.h = h;
		setgetDrawableSize();
		this.speedy = 0;

	}
	//円表示
	public void Circledraw(Canvas c,Paint p){
		p.setStyle(style);
		p.setAlpha(alpha);
		p.setColor(col);
		c.drawCircle(px, py, w, p);
	}
	public void Drawablesinit(Drawable[] img,float px,float py,int w, int h){
		objs = new Drawable[5];
		this.objs = img;
		this.px = px;
		this.py = py;
		this.w = w;
		this.h = h;
		setgetDrawableSize();
		this.speedy = 0;
		this.speedx = 0;
		objs_state = 0;
		jet_state=false;
		grade = 270;

	}
	//四角形表示
	public void Rectdraw(Canvas c,Paint p){
		wh = w/2;hh=h/2;
		rect = new Rect((int)(px-wh), (int)(py-hh), (int)(px+wh), (int)(py+hh));
		p.setAlpha(alpha);
		p.setColor(col);
		c.drawRect(rect, p);
	}
	//ライン表示
	public void Linedraw(Canvas c,Paint p){
		p.setStrokeWidth(lw);
		p.setStyle(style);
		p.setColor(col);
		c.drawLines(linexy, p);
	}
	//Drawable型の画像表示
	public void Drawabledraw(Canvas c,Paint p){
		wh = w/2;hh=h/2;
		rect = new Rect((int)(px-wh), (int)(py-hh), (int)(px+wh), (int)(py+hh));
		obj.setBounds(rect);
		obj.draw(c);


		Stringdraw("sp:"+speedy,rect.left,rect.top,20,Color.RED,c,p);
	}
	public void Drawablesdraw(Canvas c,Paint p){
		wh = w/2;hh=h/2;
		c.rotate(grade+90, px, py);
		rect = new Rect((int)(px-wh), (int)(py-hh), (int)(px+wh), (int)(py+hh));
		objs[objs_state].setBounds(rect);
		objs[objs_state].draw(c);

		if(jet_state == true){
			objs[4].setBounds(new Rect((int)(px-wh), (int)(py+hh), (int)(px+wh), (int)(py+hh*2)));
			objs[4].draw(c);
		}

		Stringdraw("g:"+grade,rect.left,rect.top,20,Color.RED,c,p);
	}
	public void DrawableJump(float ac,int x, int y){
		float angle = (float) Math.atan2(y-py, x-px);
		float vx = (float) Math.cos(angle);
		float vy = (float) Math.sin(angle);
		speedx += ac;
		px += vx * speedx;
		speedy += ac;
		py += vy * speedy;

		grade = this.toGrade(angle);
	}
	//String型表示
	public void Stringdraw(String str,int x,int y,int size,int col,Canvas c,Paint p){
		p.setColor(col);
		p.setTextSize(size);
		c.drawText(str, x, y, p);
	}
	public float toGrade(float ang){return (float) (ang * (180 / 3.141592));}
	public void setJetState(boolean jet,int os){jet_state = jet;objs_state = os;}
	public void setJetState(boolean jet,int os,int x,int y){jet_state = jet;objs_state = os;}
	public void setPx(float x){px = x;}
	public void setPy(float y){py = y;}
	//このクラスのRect短形を取り出せるメソッド
	public Rect getRect(){return rect;}

	//このクラスのライン座標配列を取り出せるメソッド
	public float[] getLinexy(){return linexy;}

	//どのスマホの機種でもうまく表示出来るように、Rect短形座標変換
	public Rect setgetRectSize(Rect rect){
		this.rect = rect;
		double dw = disp_w / 854f;
		double dh = disp_h / 480f;

		int w;int h;
		w = this.rect.right;
		h = this.rect.bottom;
		this.rect.left *= dw;
		this.rect.top *= dh;
		w *= dw;
		h *= dh;
		this.rect.right = this.rect.left + w;
		this.rect.bottom = this.rect.top + h;

		return this.rect;
	}

	//どのスマホの機種でもうまく表示出来るように、ライン座標変換
	public float[] setgetLineSize(float[] lxy){
		linexy = new float[4];
		linexy = lxy;
		double dw = disp_w / 854f;
		double dh = disp_h / 480f;

		linexy[0] *= dw;
		linexy[1] *= dh;
		linexy[2] *= dw;
		linexy[3] *= dh;

		return linexy;
	}

	//どのスマホの機種でもうまく表示出来るように、座標変換
	public void setgetDrawableSize(){
		double dw = disp_w / 854f;
		double dh = disp_h / 480f;

		px *= dw;
		py *= dh;
		w *= dw;
		h *= dh;
	}

}
|
メンバ変数の追加は角度を格納するgradeだけです。 画像表示Drawabledraw()でc.rotate()メソッドを追加しています。進む方角に合わせて画像も回転するようにしています。引数は c.rotate(角度、回転の中心x座標、回転の中心y座標)となっていて、角度に+90しているのは、右方向が0度になっているため上方向を0度に調整するためです。 その角度を算出するめそっどDrawableJump()メソッドですが、引数にタップxy座標も受け取るようにしています。自分のいる場所、今回はロボの中心座標px,pyから、タップ方向へ行きたいx,y座標がわかっているのでatan2(y-py,x-px)で360度を3.14*2で表したラジアン値が出ます。x方向にcos(ラジアン)、y方向にsin(ラジアン)とすれば、1回にその角度に進む値がでます。これは最小値なので、これにspeedx,yを掛け合わせて進む距離を増やしています。 |
| 実行結果 |
タップする方向に飛んでいくロボがここにいます。 しかしおかしなところがいくつもあり、タップをやめると最後にタップを離した場所でうろちょろしたりします。しかししっかりした動きのものを作ろうとは思っていないので、思い通りの動きができたので満足です。 触っててわかったのですが、なんか車のドリフト的な動きに見えたりもしますね。 ちょっとだけの変更で全然違う想像ができちゃうからプログラミングはおもしろいんですよね。 |
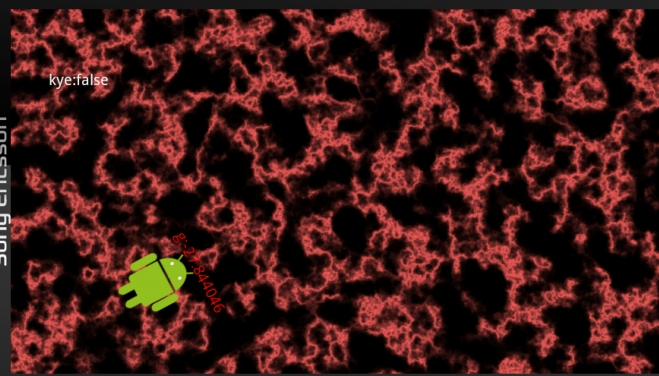 |
| タップした方向にロボが飛びます。 |
ちょっとした変更がなかなかおもしろくて先に進めません。 まだまだ模索すれば、新たな動きに目覚めるロボがそこにいるのかもしれませんね! |
骨組み作成、簡単な画像表示、タップ処理 |
|
その1をちょっとした変更で劇的に変化 |
|
アニメーション |
|
タップ方向に動かし、画像も回転 |
|